Torque

Forums

Forums

Guest  

Show or hide header
Welcome Guest, posting in this forum require registration.


Torque » Torque OBD ECU Scanner » Torque Discussion / Ideas » New: Plugin support(3rd party add-ons, PIDs, etc)

Pages: 1 2 3 4 5 6 7 8 9 10 11 12 [13] 14 15 16
Author Topic: New: Plugin support(3rd party add-ons, PIDs, etc)
virhan
Member
Posts: 4
Post Re: New: Plugin support (3rd party add-ons, PIDs, etc)
on: July 2, 2016 (GMT)

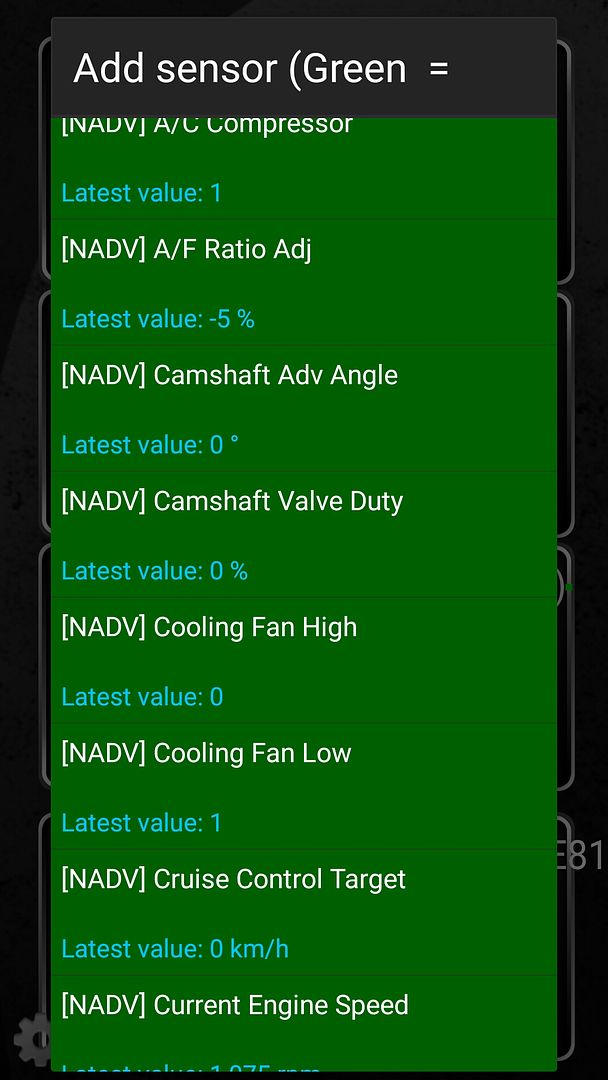
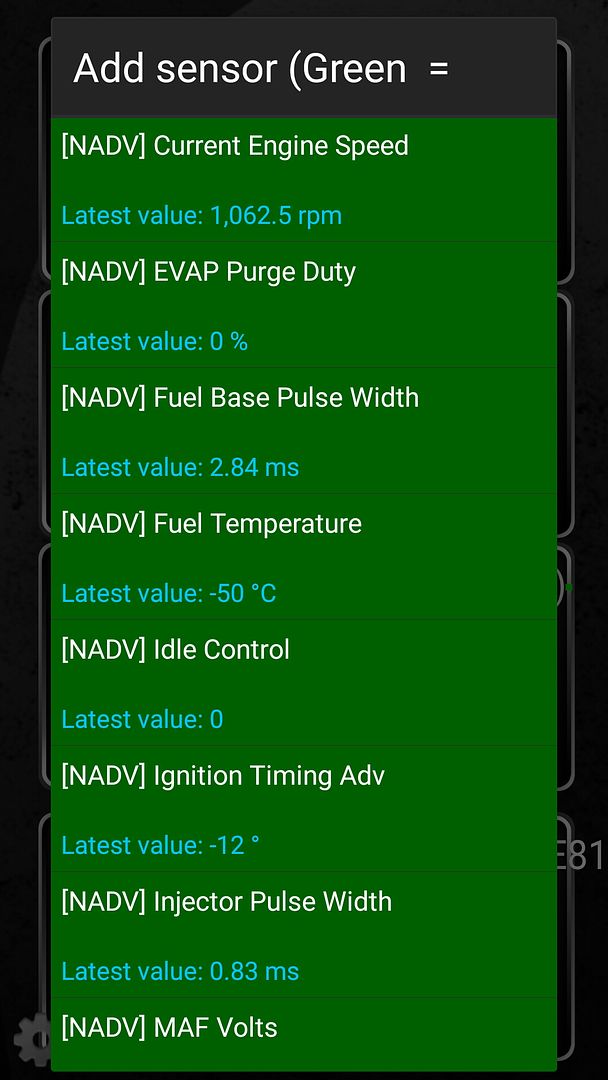
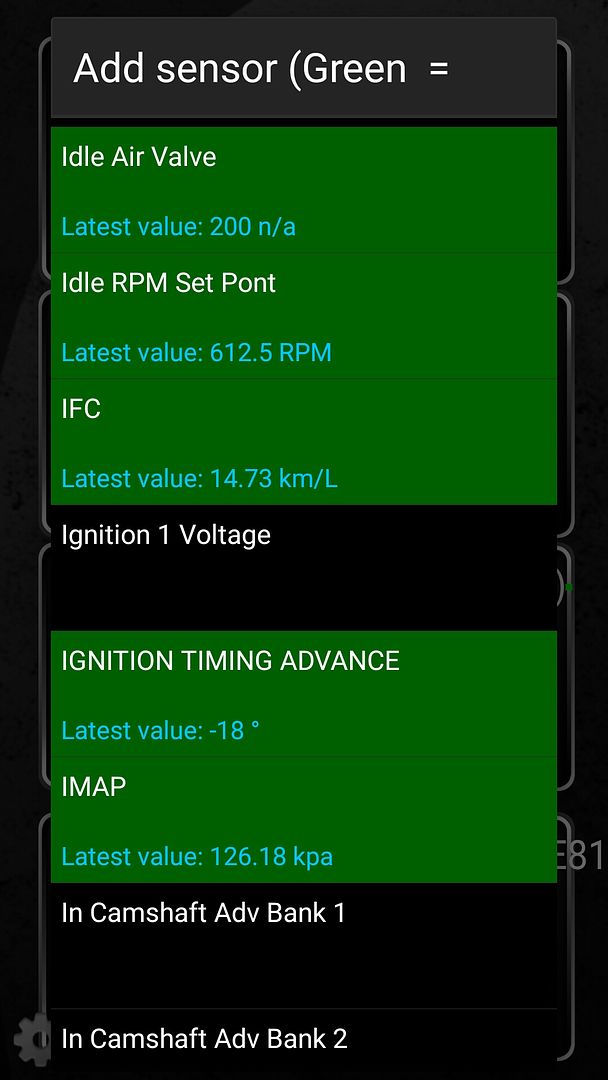
Almost all of PID from Nissan Advance EX works,but no any standard PID on the list works. So I developing some extended PID and they re works

Nissan hr15de owner

OldGit
Member
Posts: 5
Post Re: New: Plugin support (3rd party add-ons, PIDs, etc)
on: July 2, 2016 (GMT)

I have the 2.0 diesel (Mr9 Engine) and i am trying to get pids for:

DPF Load
Glow Plugs
Exhaust Temps (Cat/DPF)

Schnurf73
Member
Posts: 1
Post Re: New: Plugin support (3rd party add-ons, PIDs, etc)
on: July 12, 2016 (GMT)

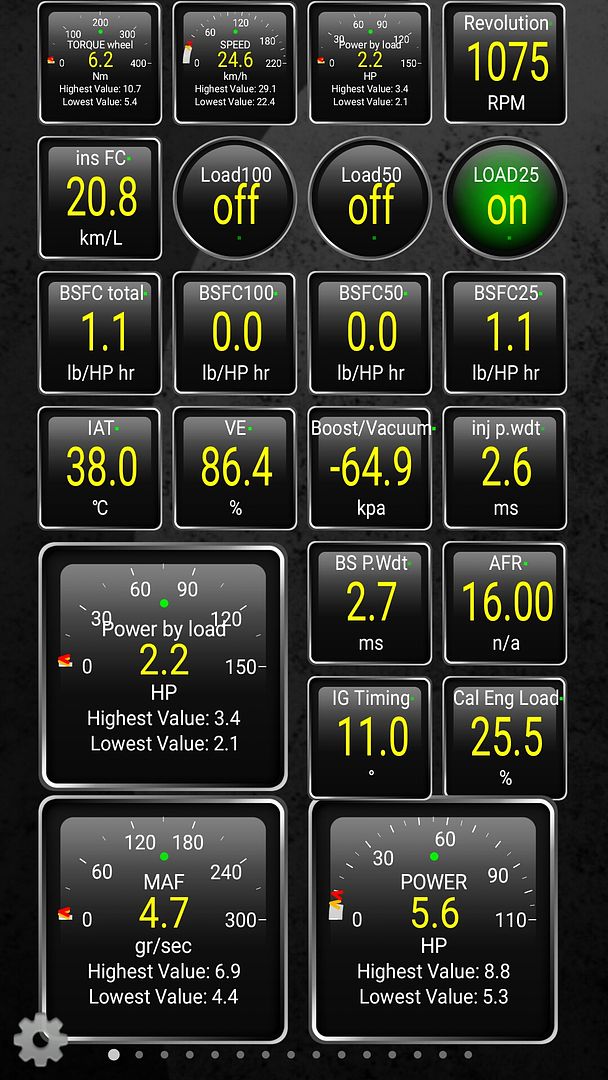
hello, can you please tell me if it a possible with the application to read the oil temperature for a subaru wrx still 2011. it s seem not possible but there is any additional equation pids?

thanks a lot and best regards

cintakc
Member
Posts: 1661
Post Re: New: Plugin support (3rd party add-ons, PIDs, etc)
on: July 30, 2016 (GMT)

Schnurf73
with the release of a new program update to enable requests to issue more than 4 bytes, it will be possible

Hectorgamez0439
Member
Posts: 1
Post Re: New: Plugin support (3rd party add-ons, PIDs, etc)
on: July 31, 2016 (GMT)

Hello I was wondering wish was the best Elm Bluetooth adapter was best for my 01 ranger 3.0 I read the new 2.1 version couldn’t be used on trucks and the it was harmful to the car computer can anyone answer these questions for me please I would gladly appreciate it

AC King
Member
Posts: 5
Post Re: New: Plugin support (3rd party add-ons, PIDs, etc)
on: August 2, 2016 (GMT)

New user, great app, but having trouble with torque scan. Have imported the ford pids and erased those not compatible with my 2007 fiesta.I know they work because in setup using the test option they all return values. The pid response is immediate but the formula result takes a minute or two. However using torque scan, takes hours , completes but returns no information.
My cheap Chinese mini adapter talks to ford fiesta using 4can 11 500 protocol. Thx for ur help
BTW…the formulas for boost and Map (ford specific) downloadable pids are wrong, both answers are 10x too large

AC King
Member
Posts: 5
Post Re: New: Plugin support (3rd party add-ons, PIDs, etc)
on: August 16, 2016 (GMT)

Have tried full pid scan, WiFi and screen both off and no other apps running. Even plugged in to car and charging, battery gos flat before scan completes. The good news is it does return some values for 219a B and c, no idea what they are, they don’t change values but one oscillates between 3 and 4 bytes.

AC King
Member
Posts: 5
Post Re: New: Plugin support (3rd party add-ons, PIDs, etc)
on: August 21, 2016 (GMT)

?

LuK4S87
Member
Posts: 2
Post Re: New: Plugin support (3rd party add-ons, PIDs, etc)
on: August 30, 2016 (GMT)

Hello,
I apologize for my bad English.

I installed torque of Android Car Radio 2 din on the Smart ForTwo 451 of 2012.

I want to know how to set the audible alarms

For example: Water temperature too low or too high water temperature etc.

There’s a way?

Thank you

alexsmith
Member
Posts: 3
Post Re: New: Plugin support (3rd party add-ons, PIDs, etc)
on: September 17, 2016 (GMT)

Hi! Finally got to the end of this thread!

My intention was to understand how to create plugins for Torque, of course, but also to create a “resume” functionality for TorqueScan. The purpose is simple: optionally continue from where it stopped. This would be specially useful when doing the full scan, as it takes ages to complete…

By inspecting TorqueScan plugin, I noticed it does basically three kinds of scan:

1. Scan using “24” commands, on ScanActivity.java, line 243:

final String[] response = torqueService.sendCommandGetResponse(header, “24”+command+”FFFF”);

2. Scan using “21” commands, on ScanActivity.java, line 285:

final String[] response = torqueService.sendCommandGetResponse(header, “21”+command );

3. Scan using “22” commands, on ScanActivity.java, line 343:

final String[] response = torqueService.sendCommandGetResponse(header, “22”+command +”01″);

So I believe a “resume” option would be a bit more complex to implement (the stage (1, 2 or 3) should also be saved to be restored later. Am I right?

alexsmith
Member
Posts: 3
Post Re: New: Plugin support (3rd party add-ons, PIDs, etc)
on: September 17, 2016 (GMT)

Hello!

I had a play on Torque Plugin Development and found it a bit difficult to understand all steps. Maybe because I’m new to the Android programming world… So I decided to document my learning process and share with you, hoping to ease the future plugins development.

I used Android Studio 2.1.3 (Linux version) for this. For testing/deploying, I used a Samsung Galaxy S5 with Android 6.0.1 (Marshmallow).

This how-to is a “Hello World!” intended to help developers understand the basics behind Torque plugins development.

First of all, we open Android SDK and:

1. Create new project
1.1 Choose a name, company and project location. Click Next.
1.2 Choose the API version number (API 23, for example). Click Next.
1.3 Choose “Empty Activity”. Click Next.
1.4 Name “Activity Name” as “PluginActivity”. Other names won’t work. Leave “Layout Name” as it is. Click Finish.

2. Edit AndroidManifest.xml to tell you want to attach to torque. Do this by replacing the “<activity>” xml entry like this:

        <activity android:name=".PluginActivity">
            <intent-filter>
                <action android:name="org.prowl.torque.ACTIVITY_PLUGIN" />
            </intent-filter>
            <intent-filter>
                <action android:name="android.intent.action.MAIN" />
            </intent-filter>
        </activity>  

At this point, you can deploy your “Hello World” and Torque will see it.

Of course the plugin does nothing and is not yet communicating with Torque. So let’s develop it a little further.

In order to interface with Torque, we need to get Torque’s AIDL file, which will expose Torque’s available API calls. There’s a number of ways you can do that. I’ve chosen to do like this:

1. Create a directory where the AIDL will be saved to.

$ mkdir -p <project_path>/app/src/main/aidl/org/prowl/torque/remote/

2. Get latest Torque AIDL file:

$ wget "http://torque-bhp.com/ITorqueService.aidl" -O <project_path>/app/src/main/aidl/org/prowl/torque/remote/ITorqueService.aidl

Going back to Android SDK, the project will refresh itself and you’ll see a new folder containing the AIDL file.

Now we must bind to Torque to get access to its functions. The following code for PluginActivity.class should be sufficiently documented for you to understand what’s going on.

package com.alexsmithsoftware.alextorquepidscanner;

import android.app.Activity;
import android.app.AlertDialog;
import android.content.ComponentName;
import android.content.Intent;
import android.content.ServiceConnection;
import android.os.IBinder;
import android.os.RemoteException;
import android.os.Bundle;
import android.widget.TextView;

import org.prowl.torque.remote.ITorqueService;

public class PluginActivity extends Activity {

    /**
     * Attribute to handle all calls we do to Torque.
     */
    private ITorqueService torqueService;

    /**
     * Method to tell what will be shown when plugin initiates.
     * 
     * @param savedInstanceState
     */
    @Override
    protected void onCreate(Bundle savedInstanceState) {
        super.onCreate(savedInstanceState);
        setContentView(R.layout.activity_plugin);
    }

    /**
     * When application is resumed (first start or comming back from lock screen),
     * we try to bind to Torque.
     */
    @Override
    protected void onResume() {
        super.onResume();

        try {
            // Bind to the torque service
            Intent intent = new Intent();
            intent.setClassName("org.prowl.torque", "org.prowl.torque.remote.TorqueService");
            boolean successfulBind = bindService(intent, connection, 0);

            if ( ! successfulBind ) {
                throw new Exception("Couldn't connect to Torque");
            }
        } catch ( Exception e ) {
            info("Error: " + e.getMessage());
        }
    }

    /**
     * When screen is on pause (on lock screen or when user hit back), we unbind.
     */
    @Override
    protected void onPause() {
        super.onPause();

        unbindService(connection);
    }

    /**
     * General method to do what we want to do once connected.
     */
    private void displayVersion() {
        int torqueVersion = 0;
        int minVersion = 26;

        try {
            if (torqueService != null) {
                torqueVersion = torqueService.getVersion();
                if (torqueVersion < minVersion) {
                    throw new Exception("Minimum Torque version for this plugin is " + minVersion + ". You're running " + torqueVersion + ". Please update.");
                }
            }
        } catch ( Exception e ) {
            info("Error: " + e.getMessage());
        }

        TextView t = (TextView) findViewById(R.id.txtTest);
        t.setText("Current Torque version: " + torqueVersion);
    }

    /**
     * Auxiliary method to show a message box with an Ok button
     */
    private void info(String msg) {
        AlertDialog.Builder dlgAlert  = new AlertDialog.Builder(this);
        dlgAlert.setMessage(msg);
        dlgAlert.setTitle(getString(R.string.app_name));
        dlgAlert.setCancelable(true);
        dlgAlert.setPositiveButton("Ok", null);
        dlgAlert.create().show();
    }

    /**
     * Attribute to handle our connection to Torque. Overridden method onServiceConnected
     * is called when we bind successfully to Torque. Overriden method onServiceDisconnected
     * is called when we unbind the connection.
     */
    private ServiceConnection connection = new ServiceConnection() {
        /**
         * What to do when we get connected to Torque.
         * 
         * @param arg0
         * @param service
         */
        public void onServiceConnected(ComponentName arg0, IBinder service) {
            torqueService = ITorqueService.Stub.asInterface(service);
            displayVersion();
        };

        /**
         * What to do when we get disconnected from Torque.
         * 
         * @param name
         */
        public void onServiceDisconnected(ComponentName name) {
            torqueService = null;
        };
    };
}

That's it!

In the end, you'll have a working code, which does a call to Torque and get the version number and displays it in a TextView.

Hope this can help someone out there.

mirzanabil
Member
Posts: 5
Post Re: New: Plugin support (3rd party add-ons, PIDs, etc)
on: November 28, 2016 (GMT)

Ian,

I noticed that sometime when I send the SendCommandGetResponse() , it appears that the command is sent in the middle of communication between Torque and the adapter. e.g.

Torque send: 0100
adapter respond: BUS INIT…
Torque send: ATFI (this is what I send from my plugin)
adapter send:…ERROR

Note that Torque is sending my request before it could finish handling the 0100 request.

Please help.

blown maloo
Member
Posts: 40
Post Re: New: Plugin support (3rd party add-ons, PIDs, etc)
on: February 15, 2017 (GMT)

is there any one that has or can build the pids to suite the PX ford ranger with 3.2 diesel engine and auto trans
the ford specif pid pack is useless for the ranger it is only any good for some ear
y Ftrucks 2005 ish

Australia FNQ

andy09
Member
Posts: 3
Post Plugin :setPIDInformation, logging problem
on: February 15, 2017 (GMT)

Hello,

I am using torque pro with a scantools.net elm327 MX device (bluetooth)

My plugin collects data from a different source (Bluetooth spp) and feeds the data (EGT left and right bank) into torque.

All works fine in the realtime display and both data, elm327 and my plugin data are displayed correctly and concurrently.

Problem comes when I start logging.

Then all my data fed in from my plugin is not logged.

What can I do?

I tried – disable obd fast mode
– sync mode on /off

all this doesn’t really help, my own plugin data is not logged.

Anyone have an idea ?

Regards

Andreas

andy09
Member
Posts: 3
Post sendPIDDataV2
on: February 16, 2017 (GMT)

Can someone give an example of correct use of

sendPIDDataV2 ?

How does this function work?

will this function
1.call the ELM327 with the ModeandPid function,
2. get the byte response from elm327
3. use equation to calculate the float value to be displayed?

What is the difference in the private version?

If I want to feed data into torque that is not comin from elm327 but from somewhere else ho do I procede?

Can I still use sendPIDDataV2 or do I have to use
setPIDInformation?

Finally , please have a look at my question on logging one thread above.

regards

Andreas
—————

/**
* Method to send PID data in raw form.
* This updated method allows diagnostic headers to be set if required (for special commands) or left as null.
* Name, ShortName, ModeAndPID, Equation, Min, Max, Units, Header,Start diagnostic command, Stop diagnostic command
*/
boolean sendPIDDataV2(String pluginName, in String[] name, in String[] shortName, in String[] modeAndPID, in String[] equation, in float[] minValue, in float[] maxValue, in String[] units, in String[] header, in String[] startDiagnostic, in String[] stopDiagnostic);

GoRoav
Member
Posts: 1
Post Re: New: Plugin support (3rd party add-ons, PIDs, etc)
on: March 14, 2017 (GMT)

Hi Ian and the Torque Team. We love your product! My name is Max and I’m a product manager for the Roav Head-Up Display (http://www.GoRoav.com). I want to talk about porting your app for our device. We want to share Torque with our user base – and we think the integration could be very slick! Please contact me! You can find my email from my user account.

Have a great day.

Max

Product Manager on Roav Head-Up Display

WhatsADSM
Member
Posts: 1
Post Re: New: Plugin support (3rd party add-ons, PIDs, etc)
on: June 13, 2017 (GMT)

Quote from alexsmith on September 17, 2016
Hello!

I had a play on Torque Plugin Development and found it a bit difficult to understand all steps. Maybe because I’m new to the Android programming world… So I decided to document my learning process and share with you, hoping to ease the future plugins development.

I used Android Studio 2.1.3 (Linux version) for this. For testing/deploying, I used a Samsung Galaxy S5 with Android 6.0.1 (Marshmallow).

This how-to is a “Hello World!” intended to help developers understand the basics behind Torque plugins development.

First of all, we open Android SDK and:

1. Create new project
1.1 Choose a name, company and project location. Click Next.
1.2 Choose the API version number (API 23, for example). Click Next.
1.3 Choose “Empty Activity”. Click Next.
1.4 Name “Activity Name” as “PluginActivity”. Other names won’t work. Leave “Layout Name” as it is. Click Finish.

2. Edit AndroidManifest.xml to tell you want to attach to torque. Do this by replacing the “<activity>” xml entry like this:

        <activity android:name=".PluginActivity">
            <intent-filter>
                <action android:name="org.prowl.torque.ACTIVITY_PLUGIN" />
            </intent-filter>
            <intent-filter>
                <action android:name="android.intent.action.MAIN" />
            </intent-filter>
        </activity>  

At this point, you can deploy your “Hello World” and Torque will see it.

Of course the plugin does nothing and is not yet communicating with Torque. So let’s develop it a little further.

In order to interface with Torque, we need to get Torque’s AIDL file, which will expose Torque’s available API calls. There’s a number of ways you can do that. I’ve chosen to do like this:

1. Create a directory where the AIDL will be saved to.

$ mkdir -p <project_path>/app/src/main/aidl/org/prowl/torque/remote/

2. Get latest Torque AIDL file:

$ wget "http://torque-bhp.com/ITorqueService.aidl" -O <project_path>/app/src/main/aidl/org/prowl/torque/remote/ITorqueService.aidl

Going back to Android SDK, the project will refresh itself and you’ll see a new folder containing the AIDL file.

Now we must bind to Torque to get access to its functions. The following code for PluginActivity.class should be sufficiently documented for you to understand what’s going on.

package com.alexsmithsoftware.alextorquepidscanner;

import android.app.Activity;
import android.app.AlertDialog;
import android.content.ComponentName;
import android.content.Intent;
import android.content.ServiceConnection;
import android.os.IBinder;
import android.os.RemoteException;
import android.os.Bundle;
import android.widget.TextView;

import org.prowl.torque.remote.ITorqueService;

public class PluginActivity extends Activity {

    /**
     * Attribute to handle all calls we do to Torque.
     */
    private ITorqueService torqueService;

    /**
     * Method to tell what will be shown when plugin initiates.
     * 
     * @param savedInstanceState
     */
    @Override
    protected void onCreate(Bundle savedInstanceState) {
        super.onCreate(savedInstanceState);
        setContentView(R.layout.activity_plugin);
    }

    /**
     * When application is resumed (first start or comming back from lock screen),
     * we try to bind to Torque.
     */
    @Override
    protected void onResume() {
        super.onResume();

        try {
            // Bind to the torque service
            Intent intent = new Intent();
            intent.setClassName("org.prowl.torque", "org.prowl.torque.remote.TorqueService");
            boolean successfulBind = bindService(intent, connection, 0);

            if ( ! successfulBind ) {
                throw new Exception("Couldn't connect to Torque");
            }
        } catch ( Exception e ) {
            info("Error: " + e.getMessage());
        }
    }

    /**
     * When screen is on pause (on lock screen or when user hit back), we unbind.
     */
    @Override
    protected void onPause() {
        super.onPause();

        unbindService(connection);
    }

    /**
     * General method to do what we want to do once connected.
     */
    private void displayVersion() {
        int torqueVersion = 0;
        int minVersion = 26;

        try {
            if (torqueService != null) {
                torqueVersion = torqueService.getVersion();
                if (torqueVersion < minVersion) {
                    throw new Exception("Minimum Torque version for this plugin is " + minVersion + ". You're running " + torqueVersion + ". Please update.");
                }
            }
        } catch ( Exception e ) {
            info("Error: " + e.getMessage());
        }

        TextView t = (TextView) findViewById(R.id.txtTest);
        t.setText("Current Torque version: " + torqueVersion);
    }

    /**
     * Auxiliary method to show a message box with an Ok button
     */
    private void info(String msg) {
        AlertDialog.Builder dlgAlert  = new AlertDialog.Builder(this);
        dlgAlert.setMessage(msg);
        dlgAlert.setTitle(getString(R.string.app_name));
        dlgAlert.setCancelable(true);
        dlgAlert.setPositiveButton("Ok", null);
        dlgAlert.create().show();
    }

    /**
     * Attribute to handle our connection to Torque. Overridden method onServiceConnected
     * is called when we bind successfully to Torque. Overriden method onServiceDisconnected
     * is called when we unbind the connection.
     */
    private ServiceConnection connection = new ServiceConnection() {
        /**
         * What to do when we get connected to Torque.
         * 
         * @param arg0
         * @param service
         */
        public void onServiceConnected(ComponentName arg0, IBinder service) {
            torqueService = ITorqueService.Stub.asInterface(service);
            displayVersion();
        };

        /**
         * What to do when we get disconnected from Torque.
         * 
         * @param name
         */
        public void onServiceDisconnected(ComponentName name) {
            torqueService = null;
        };
    };
}

That's it!

In the end, you'll have a working code, which does a call to Torque and get the version number and displays it in a TextView.

Hope this can help someone out there.

Thank you for this. Very helpful!

jimicloudstuff
Member
Posts: 1
Post GM Specific Plugin
on: August 3, 2017 (GMT)

Hi.
I’ve noticed a bunch of manufacture specific plugins, if any coders out there feel like making one for GM (Chevy in particular) I know I am not the only one who would pay for it!

If anyone knows of one that already exists please let me know

Thanks

blautens
Member
Posts: 3
Post Re: New: Plugin support (3rd party add-ons, PIDs, etc)
on: August 5, 2017 (GMT)

Quote from jimicloudstuff on August 3, 2017
Hi.
I’ve noticed a bunch of manufacture specific plugins, if any coders out there feel like making one for GM (Chevy in particular) I know I am not the only one who would pay for it!

If anyone knows of one that already exists please let me know

Thanks

There is one already. I don’t think I had to download it. Open Torque (I have Pro, I don’t know if it’s in the free version) and go to Settings, Manage extra PIDS/Sensors. Here you can create your own PID or add some – to add, click on the menu (for Nougat, 3 dots in the upper right) and choose “Add predefined set”. Choose the Pontiac/GM/Opel/Vauxhall one.

Then when you go to your dashboard and add a display, the settings imported will have the prefix [GM].

Keep in mind, this isn’t perfect. For me, I have to change the formula for Transmission Gear.

As you upgrade versions, I believe these sets can upgrade. I noticed when I reimported the GM ones when switching phones that there were many more GM sensors.

bubble am
Member
Posts: 1
Post bubble am
on: August 9, 2017 (GMT)

Hello. I know your site through google and I have registered. I am very happy to be acquainted with you. I have some very interesting games that will help you to relieve stress after hours or study tired. In addition, brain training for you. Please visit to try it.
bubble.am, ludo king games

Pages: 1 2 3 4 5 6 7 8 9 10 11 12 [13] 14 15 16
WP-Forum by: Fredrik Fahlstad, Version: 2.4
Page loaded in: 0.073 seconds.

  Follow me on twitter